October 05, 2014

DIY Play Makeup

My little girl (who is 18 months old) loves to sit next to me while I do my hair and makeup. She mimics me, and loves getting into my makeup bag. It is really adorable!!

There have even been a couple times I have caught her with the concealer stick. For whatever reason, that is her go to item, and she loves smearing it all over her face.

I decided to buy her a set of play makeup that she couldn't make a mess with. But after searching at several stores and online, I found nothing like what I was looking for.

I either found real "play" makeup, or incredibly expensive pretend makeup sets.

This is why I love am obsessed with Pinterest! I knew I could find a way to make mine own.

I was right, it was so simple, and super cheap - maybe even free if you already have all the needed supplies.

What you will need:
  • Empty or used make up compacts that you no longer need/want 
  • Qtips and something sharp/pointed tip (to scrape out any make up left in the compact)
  • Fingernail polish (in whatever colors you would like)
Then follow these three simple steps:

Clean the make up out of the compact(s)
2. Use the Qtips (and a little bit of water) to make sure the compact is completely clean & dry
Pour the nail polish into the compact, and wait for it to dry.
Voila! It's that simple

Here are some helpful tips I learned - Fill the compact as full as possible, and give it plenty of time to dry completely. I let mine sit over night.

Also, the nail polish tended to shrink a little after drying so I decided to fill them up a little more and give them one more night to dry.

My daughter loves it! She walks around now putting on her makeup, saying "pretty". Oh and I ordered some play lipstick on Etsy, because I didn't feel like going through the trouble of making that too. But here is a tutorial I found on Pinterest how to make your own if you are interested.

Happy Crafting!

April 19, 2014

Sugar & Spice Party

I LOVED planning my little girl's first birthday party! I am so thankful I have a baby girl, and now I get to plan girly parties as well as boy themed parties.
 We went with a sugar and spice theme.
It fits Laney's personality perfectly. 

One minute she is the sweetest 
little thing you have ever seen, 
and the next she shows her fiesty little attitude. 

I decorated with pastel colors, and served sweet and spicy foods. 


I found this recipe on Pinterest to make turquoise lemonade. (I tweeked it a little bit, and used regular lemonade kool aid and blue raspberry kool aid.)

It turned out so pretty!

One of my favorite things to make for Laney's party was her milestone poster board.
It turned out so well!


I also made a one year family tree, full of baby pictures from our extended families, so everyone could see who Laney resembles the most. (FYI: her Daddy won)
The smash cake didn't exactly turn out the way I wanted it to, but at least you couldn't see all the imperfections in the pictures, so I guess that is all that matters. 

We layed out a pink table clothe on the wall/floor and moved some of the decorations behind Laney while she dug into her cake. It made for some pretty adorable pictures.

Here are a few of my favorites:


Happy Birthday baby girl, we can't wait to watch you grow up and celebrate many more birthdays!!

Happy Crafting!

March 30, 2014

Assemble the Minions!

This year my son wanted a Despicable Me party for his 4th birthday (or as he would call it, a "Minion Party").

I love both the movies, the minions are so cute, so I couldn't wait to start planning the decorations! It was so much fun designing everything!

I designed several "life size" minions, and I love the way they turned out!


I also cut several yellow and blue circles and stitched them together on my sewing 
machine to make party streamers.
Because I was planning this party for several months, I had time to save a few plastic containers that resembled the shape of minions. I spray painted them yellow and blue and then decorated them with hair (black pipe cleaners) and minion goggles (paper eyes, and black electrical tape). 

I used the larger containers for table decoration.
And the small containers were used for "minion bowling" 

I was really happy with the way the cake turned out. I am not a cake decorator, so I am always a little nervous about how my cakes will turn out. 

I followed this tutorial. Thank you Pinterest! The only change I made was using a mason jar lid for the silver part of the goggles, simply because it was easier and fewer steps, but it still looked great!

I will be selling these decorations in my Etsy shop, so if you see something you like, be sure to check back soon!

Happy Crafting!

March 19, 2014

Party Planning & Monster Bags

I have been busy the last few weeks preparing for my kid's birthday parties.

My son (who is turning 4), has requested to have a "Despicable Me Minion" party and my sweet baby girl is having a Sugar & Spice theme to celebrate her first birthday!

I will share pictures from their parties next month. But for now I just wanted to show what else I have been busy working on...

I have received several orders this week on the Monster Party Bags in my Etsy shop.


I designed these for my son's 2nd birthday monster party, and now they are the most popular item I sell in my shop.

This was probably one of my favorite themes I have ever done for a party. Here are some pictures of the other decorations I made...


 And of course a picture of the sweet birthday boy! Can't believe he will be turning 4 next week!


Happy Crafting!

November 04, 2013

DIY Ninja Turtle Costume

My 3 yr old son is obsessed with the Teenage Mutant Ninja Turtles. So he chose long before Halloween, that is what he wanted to dress up as, specifically Leonardo.

Besides our family not having much money to spend on store bought costumes, I love having a chance to get creative and come up with our own homemade version of a costume. So here is a tutorial on how I made a Ninja Turtle Costume.

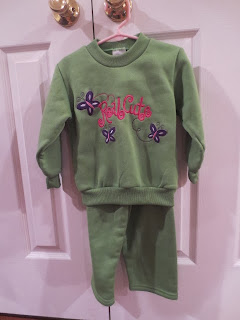
First I bought a green sweat suit. This actually was one of the most difficult parts believe it or not. I could not find a plain green sweat suit anywhere! Everything I found had some sort of design on it!

I eventually settled for one I found on eBay, it was a girl's suit and had a design on the front of the sweatshirt, but I knew I would be covering it up with a shell so I could make it work.
My son was so mad when I made him try it on. He kept saying "this is for a girl!!" He eventually gave in, once I convinced him it would be covered with a shell. 

To make the front shell, I used large pieces of felt I bought from the craft store. I didn't have a stencil so I just eyeballed the size shell I would need, and then cut out smaller pieces for the shell's details.
For the smaller pieces I used tacky glue to glue them into place (because it was easier than stitching, since I am horrible at stitching).

After all the little pieces were in place, I stitched the large shell piece onto the sweatshirt.
I didn't have to make a back shell, because my mom bought Elias a Ninja Turtle shell backpack this summer, so we decided to just use that as his costume shell. 

(It can be purchased on Amazon)
But I still needed a way to hide the backpack straps, so that it could look more like a real turtle shell. So I decided to cut slits on the sweatshirt, so that the straps could be fed through underneath the sweatshirt and then reattached. This worked out perfectly!
The final touches were to add the "ties" or whatever you call those pieces that the ninja turtles wear on their knees and elbows. For these pieces I bought a cheap $5 blue t-shirt at the craft store, and cut it into strips that were big enough to tie onto his arms and legs. 

The backpack his Nana bought, came with some maskes but I didn't like them, so I took some of the blue t-shirt and glued it to the mask, so it would match the blue ties and still keep that classic mask shape. 
Here is the finished product. I didn't get a picture with his outer shell until we were actually trick or treating, and if you have a toddler you know how hard it is to get them to pose for a picture any time, let alone when there is candy involved!
And the final touches were stuffing his sleeves to give him muscles, and then spraying his hair green, he loved it!
I hope your little ones had a Happy Halloween! 

Happy Crafting!

September 16, 2013

I am still here!

This blog is beyond neglected, but I am still here, still crafting, and still selling items out of my Etsy shop. I have the best excuse reason for not updating this blog. Her name is Laney, and she joined our family almost 6 months ago...
She just might be the cutest baby I have ever seen! (apart from my son, of course) However, she makes it hard to keep up with my Etsy shop, personal blog, facebook, twitter etc.

I am slowly learning to juggle our lives as a new family of four, and hopefully will begin posting more often!

But until then...
Happy Crafting!

June 13, 2012

Owl Party Favor Bags

Time for some more adorable owls!

A couple of weeks ago, my friend asked me if I could come up with something that she could use as party favors for the boys who are coming to her daughter's birthday party.

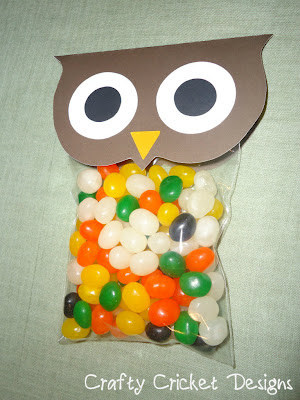
I had fun designing these adorable owl toppers for party favor bags. The bags can be filled with candy, stickers, cookies or any type of party favor.


You can find them in my Etsy shop for your little one's party....they are sure to be a hoot!!

Happy Crafting!